The DAT middle subtest, questions 41-70, is the General Chemistry section. To pass this section, you must understand theoretical, practical, and even mathematical applications. This article aims to provide a quick overview of the basic lab techniques that you will need to remember. Since it's not always easy to go through specifications every time, the article helps cross-check the important concepts in one place.
So, without further discussion, save the cheat sheet for your study revisions and ace that DAT.
Suppose you want to measure temperature changes or the amount of heat produced or absorbed in a chemical reaction. What should you do? The basic technique to measure such changes is called calorimetry.
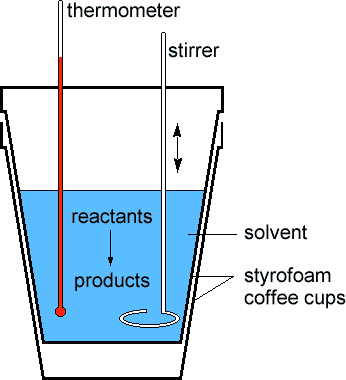
Interestingly, the setup for this test is quite simple. All you need is a sealed Styrofoam cup with a small hole for inserting the thermometer. Consequently, measuring the interim change of the reaction temperature using the thermometer.
One of the coolest techniques out there, centrifugation, separates the solids and liquids that are mixed together in heterogeneous portions.
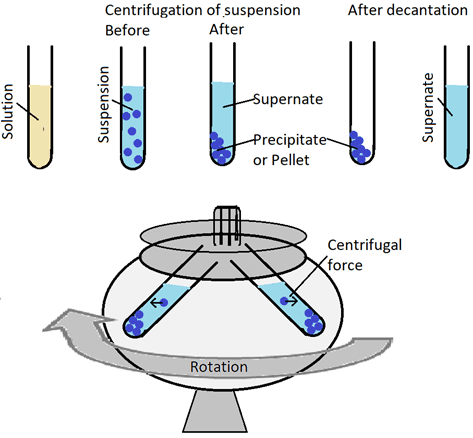
Centrifugation is successful when the solid body (pellet) sits at the bottom end, and the liquid mixture (supernatant) is above the centrifuge tube. The process requires the centrifuge always to keep a balance. You should always maintain the tube to stay in equal volume positioned in opposite directions while spinning.
Proper quantitative transfer methods are promoted to ensure the complete transfer of any substance from one medium to another. For instance, say that 10g of powder has to be transferred from a petri dish to a beaker.
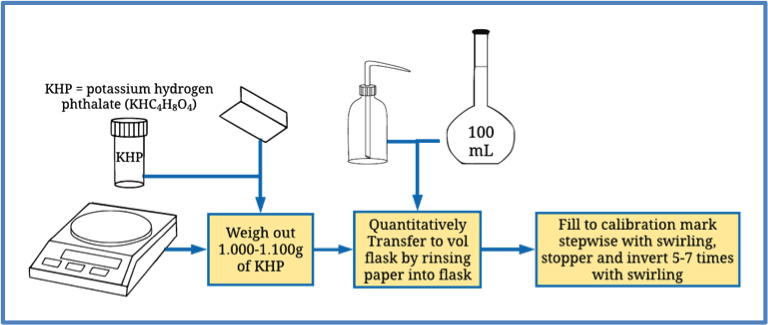
However, preventing small amounts of transfer loss from leaving traces on the petri dish is a rigorous process. Nonetheless, such slight errors can affect the result accuracy.
This is where quantitative transfer steps in.
First, weigh out the mass on a creased weighing paper for transferring powders. Then, carefully fold the weighing paper and transfer it to the appropriate apparatus, like a beaker. Moving forward, tap a spatula against the paper to remove any residual powder. Then rinse off the paper into the beaker to ensure complete transfer.
As far as the transfer of liquids is concerned, the emptied vessel needs extra care. After pouring the substance to its desired destination, wash the original vessel sides with a solvent. Then, add the washed liquid into the destination apparatus as well to avoid any liquid loss on the surfaces of the transfer pots.
Titration determines the endpoint of a chemical reaction alongside the reactant quantity required to reach it. The process calls for a burette (to ensure precise extraction of the titrant amount) and, in most cases, an Erlenmeyer flask that contains the solution. To determine the reactant quantity point, an indicator of the flask. The indicator then changes color once the equivalency point is exceeded, following the addition of a sufficient quantity of the titrant. In some cases, a pH meter is also used instead of an indicator to detect the endpoint.
Filtration is the process of separating solids from liquids when they are together in a mixed state. The solution can be poured through filter paper placed in a Buchner funnel on top of a flask.
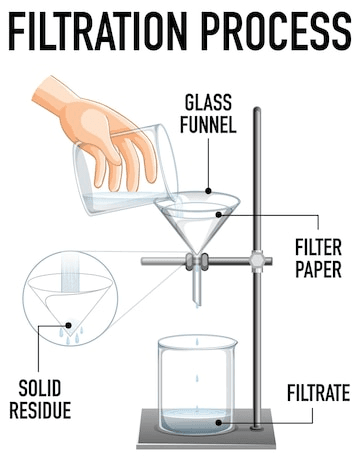
The filter flask can be used alongside a vacuum outlet for further effective filtration. The vacuum outlet draws out the liquid solution better through the filter paper, and the process is also known as vacuum filtration. The final result is that the solid is left on top of the paper, and the liquid transfers entirely to the flask below.
Graduated glassware often has a risk of parallax errors. Hence, you should always take the meniscus readings from the bottom of the curve. Therefore, the reading should be taken at eye level.
Certain kinds of glassware can be dried in an oven. However, graduated flasks such as burets, pipets, graduated cylinders, and volumetric flasks must never be dried using an oven. The heat can tamper with the calibration and ruin it completely.
After cleaning the glassware with soap/ detergent using tap water, it is next rinsed with deionized water. The deionized water reduced the probability of contaminating the forthcoming solutions with traces of residual ions.
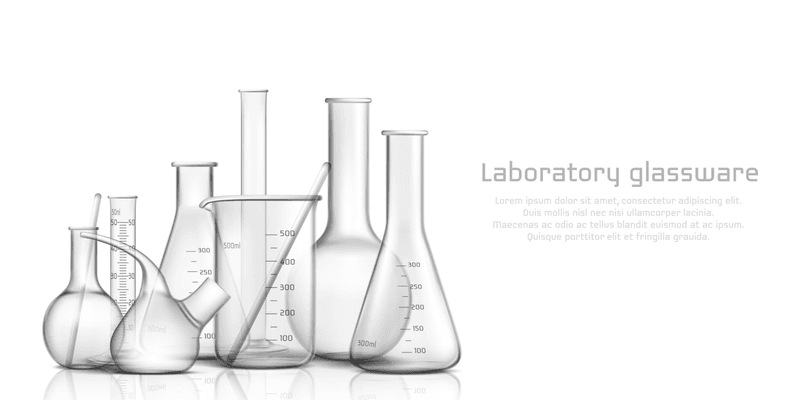
Beakers are used to transfer liquids or mixtures of liquids and even for particular reactions.
Nonetheless, since they do not give accurate readings, taking measurements with a beaker is a complete no-no.
Graduated cylinders have varying accuracy based on the given volume indications. For instance, this can be to the nearest mL. Since it's not one of the most accurate measures for liquid transfer, they are used for taking general measurements. On the other hand, if there is no need for high accuracy, it can be used for transferring liquids. Nonetheless, graduated cylinders must always be read from the lower meniscus like any other volumetric container.
As with a beaker, an Erlenmeyer flask is used to transfer liquids. But due to its inaccurate readings, this apparatus is not used for taking measurements. The advantage here is that Erlenmeyer lasks have a narrower neck compared to a beaker. This prevents the liquid mixture from splashing out of the container, especially for reactions like titrations.
Volumetric flasks store the liquid of an already known, precise volume. They have a very constricted neck with one marking denoting the amount of liquid the flask holds. This means that a 250mL volumetric flask holds exactly 250mL of liquid.
Almost identical in appearance to the Erlenmeyer flask, filter flasks are used for vacuum filtration. The only difference is the filter flask neck has a distended “side arm” to which a vacuum hose can be connected to generate suction.
Test tubes are mainly used to transfer liquids and mixtures or conduct reactions. However, they can not give accurate measurements of volume. Thus, they are not used for measurements but rather only to transfer smaller amounts of liquids.
Pipettes are extremely useful when measuring and transferring precise volumes of liquid. They are graduated( numerous markings for different volumes) or volumetric( one specific marking for a set volume). One word of caution here, never force any remaining liquid that stays at the end of the pipette after the initial transfer. This is because pipettes are calibrated to account for the residual liquid. Hence, “ blowing out” the last drops may give an inaccurate reading.
You can use burettes when transferring extremely precise volumes of liquid. Primarily, burettes aid in the titration process to deliver precise titrant amounts. It comes with a stopcock on its side so that anyone can gradually add the solution. Close the stopcock as the color changes. This identifies the endpoint of the reaction. Therefore, the markings on the burette determine the precise volume of solution used for titration.
Bunsen burners are like laboratory stoves. They produce a gas flame that provides heat to laboratory reactions. Proper caution is necessary whenever using the open flame.
The calorimeter measures the intermediate heat change from a reaction. Simultaneously, it minimizes heat transfer to the external environment. As for general chemistry labs, a simple setup of a couple of stacked Styrofoam cups and a thermometer placed in a hole with a lid on top.
To ensure high precision in measuring masses, digital balances are the foremost choice. First, clean, turn on, and fix the balance to zero. Next, place a piece of creased weighing paper on the balance and reset it to zero. This automatically eliminates the weight of the paper. Lastly, measure the mass of the subject on hand by gradually transferring it to the weighing paper. Then, record the final measurement.
pH meters measure the pH of solutions. The device can be analog or digital, depending on the laboratory settings. But in any case, pH meters must first be calibrated using known pH solutions before testing the unknown ones.
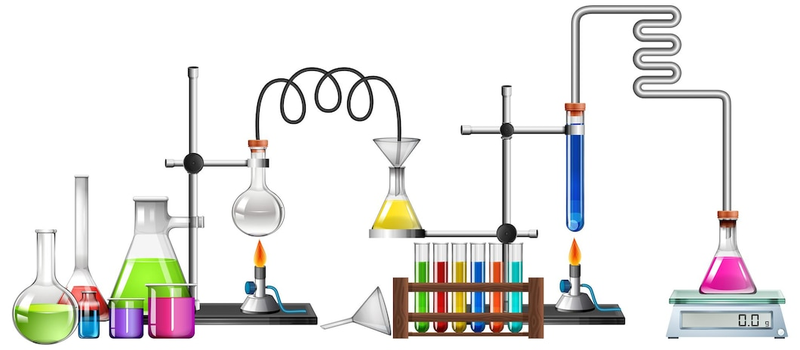
Vacuum filtration uses a Buchner funnel. It stays on the flask top and holds the filter paper in place.
As the name suggests, the gravity filtration process calls for gravity filter funnels.
Use separatory funnels to separate immiscible liquids.
Dropping funnels allow you to add liquid reagents dropwise to a flask.
You can use powder funnels to add solid reagents to a flask.

Calculate the error percentage of a determined value with respect to an actual value, using the formula: (Actual-Theoretical)/theoretical value x 100 gives
Systematic Errors result from inconsistent or flawed experimental or equipment design. However, you can always detect and correct them. For instance, if you had not calibrated the scale for mass before starting the experiment, the results would have varied by +5mg. However, you can easily adjust this error. Systematic errors can be precise but will not be exactly accurate. Interestingly, same-sourced systematic errors tend to occur in the same direction.
Random errors occur due to human data misinterpretation. Taking inaccurate meniscus readings, for example, causes measurement error. They may affect precision as well as accuracy.
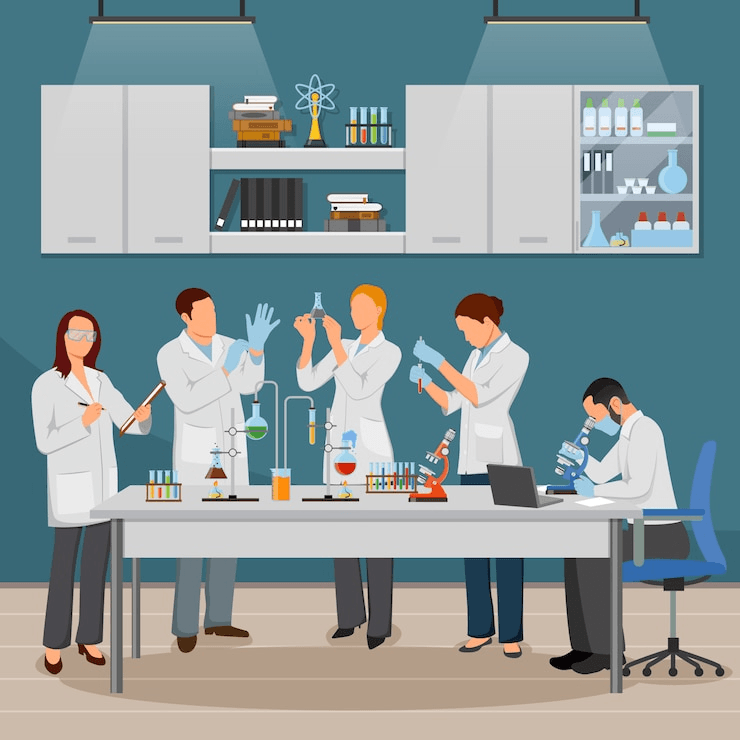
Safety showers are used to wash off any chemicals that might have been exposed to your skin. In fact, you must also remove any clothing exposed to any chemicals while taking the safety shower.
If, by any chance, your eyes have been exposed to chemicals, use eyewash to rinse them out. Remember, eyelids must remain open when rinsing.
Wearing safety goggles at all times in the lab. Only remove them once you are out of the lab. Safety goggles protect your eyes from chemical exposure from explosions or splashing.
Wear disposable gloves to protect your hands from accidental chemical exposure.
Spill neutralizers neutralize chemicals, primarily acids, and bases when there is any spillage in the lab.
Fume Hood removes any potential harmful vaporized content released during reactions. However, perform all the work in the fume hood from a minimal distance, away from the front end. This ensures proper ventilation.
Safety concerns in the laboratory are a broad aspect. Thus, it's best to skimp through your general chemistry lab manual quickly. This simply jogs your memory about the basics. Nonetheless, common sense is your best guide to answering safety questions. Note that the correct answer to dealing with unwanted lab circumstances is usually effective. This is where you resolve the matter with utmost caution and minimize the harm to yourself and others.

Significant digits indicate the measurement of uncertainty. Now, as far as calculations are concerned, you don't have to worry about them. Rather, you might be specifically asked about significant digits in the examination. So, your best bet is to review the process of determining the correct number of significant digits. Alongside this, you have to learn to handle calculations in a way that derives the correct accuracy of your answer.
Here is a shortcut to help you determine the significant digits present:
1. For numbers that have decimals, count the digits from the first non-zero number as significant. Suppose the number 50.02 has four significant digits. Similarly, in the number 00.0656000, there are 5 significant digits( 656000)
2. In case there are no decimals present in a number, count from the first non-zero number. Then, end the counting at the last non-zero number. For instance, the number 56800 has 3 significant digits: 568.
Now, you have to know the correct number of significant digits when performing calculations.
1. The answer should resort to the lesser number of significant digits for multiplication or division of numbers with differing significant digits. Let’s say you have to multiply 46.00*6.0. Here, 46.00 has 4 significant digits, while 6.0 has 2 significant digits. Therefore, you round the answer to the lower limit, 2 significant digits. Multiplying 6.0*46.00 gives 276, but since we can take up to 2signficant digits, the correct answer is 27o.
2. Things get a little bit more complicated when we are talking about addition and subtraction. You should present the answer to the digit of least accuracy for adding or subtracting numbers.
Let’s look at the following examples:
55.8+ 42.39
Here, the tenth place in 55.8 is the least accurate place. Hence, round up the final answer to the least accurate decimal place. The result comes to 98.19, but when you round up to the tenth place, the value comes to 98.2. This is also the same for whole numbers.
Here's how:
9850+ 310+22= 10,182
In this example as well, the least accurate place is the tenths. Thus, the final answer you write is not 10,182. Rather, it rounds up to 10,180.
Note that the zeros beyond a decimal point, assuming they are next to a non-zero number, count as significant.
This means if you have to add 2.50 to 4.6681, the least accurate place is the hundredth place. Therefore, instead of writing 7.1681, you adjust the total accuracy to 7.17.
To wrap it up, remembering the smallest details are often the most challenging task. The immensely thorough syllabus, exam stress, and all the other equally challenging sections of the exam can be overwhelming at the least. Although this cheat sheet is great for quick revision, this won’t be enough to suffice your practice. But don't worry! We have got that covered as well. Simply sign up with DATPrep and find yourself a new ground in the journey to ace the DAT.
With more than 5000 questions for practice, analytics, videos, and more, DATPrep is the friend you need in this race. You can learn on the go with their apps and find extended customer support on the platforms. So, begin your ultimate practice path to the perfect 30 with DATPrep today!